
Introduction
Ok, now I’ve taken the first steps to setup my new blog. I have a hosting provider (that hosts and delivers this content), I registered a domain (erwinkok.org). Great, let’s start…! But how do I get the posts, which I’m writing, to be placed on my hosting provider? Better still, how can I do this there semi-automatically? That is what this post is about. I expect you have some git knowledge to be able to workout this post.
General flow
I created a (private) repository at Github where all the sources and generated files reside. As said in my first post, I’m using Hugo for my blog, using the Stack theme. So I use the same layout as recommended. In the post directory I’m adding my posts (like this one) and view them locally to see how it will look like. When I’m satisfied, I build the website locally (hugo) which generates the output files and places them in the public directory. The public directory is eventually where the content of my blog lives. When I commit and push this to Github, it automatically installs all built files on my website (the hosting provider).
1. Setup Git in plesk
Log into plesk (a tool from your hosting provider with which you can manage your website) and go to Website & Domains (probably the default). There you see a Git button, select it and add a new repository. The following screen should appear:
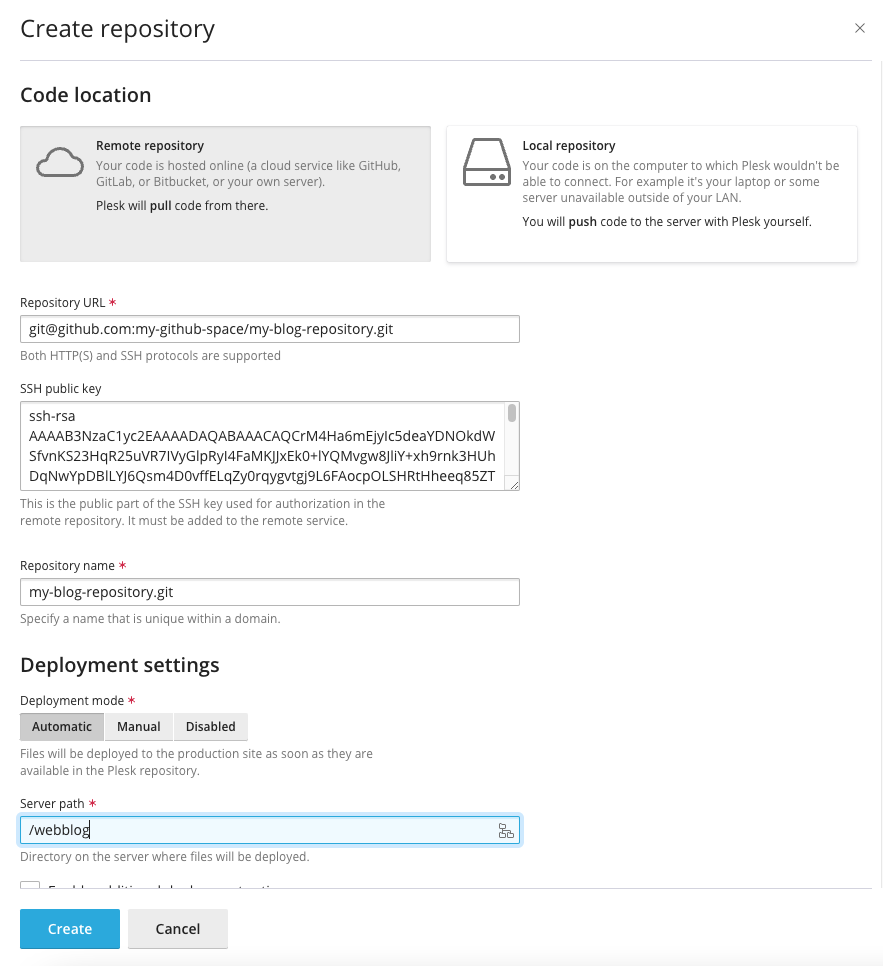
Repository Url is the url where the git repository is located, for example at Github:
|
|
Plesk generates automatically a key pair (a private and public key). The private key is invisible, but the public key is visible in the SSH Public Key area. We need this public key in the next section.
The repository name is automatically filled in, it is the last part of the url.
Set the deployment setting on Automatic. If set to Manual you still have to go to plesk and manually press the deploy button each time new content is committed/pushed to Github.
Do NOT press Apply yet, because plesk is not allowed to access Github. Pressing Apply will result in an error.
2. Setup in Github
If you created a private repository in Github, nobody can access it. So, also Plesk can not access it. Therefor we have to tell Github that Plesk is allowed to access Github. Thats why we need the public key that was generated by plesk in the first step, and configure Github with it.
In a different browser tab, go to github, go to Settings (top-right corner, select your profile. A pop down menu appears. Select Settings). A new menu appears on the left side, select SSH and GPG keys.
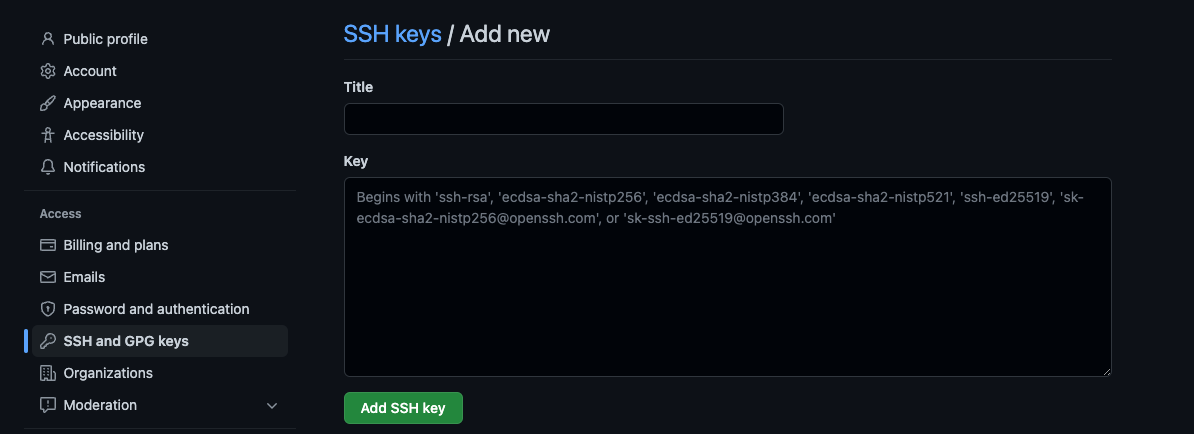
In title, write something useful just to remember for what this key is intended for. Like: Webhosting.
In the key-filed, put the key that was automatically generated by plesk in the previous step.
3. Continue configuration in Plesk
When we go back to plesk, we can press the Apply button. Now plesk will connect to Github and retrieves the repository information. Select configure (the button with the dials in the right bottom corner).
Here we have to configure two fields:
-
The
repository branchwhich branch of the Git repository has the correct content from which we deploy our website? -
Server pathwhere does Plesk store the files pulled from Github?
For the repository branch I select main. For server path I select the directory destination we will create in the next step, for example put /webblog here.
Lastly, copy the content of the Webhook, this is needed at a later step.
4. Create destination folder
In plesk, select Files. There you can create a new folder using the + button from the top. Create the directory that was mentioned in the previous step. In my example: /webblog.
5. Setting up the webhook in Github
We are almost there, two more steps to go.
How does Plesk know that the content of the Git repository has been changed? That is where the Webhook, copied from an earlier step, is for.
Again, go to your repository in Github and select Settings (this is the settings of the repository, not the settings of your profile like we used in the previous step). On the rleft side a menu appears and select Webhooks. Create new webhook, and paste the url that we copied earlier in this field. Leave this rest of the fields as-is.
Whenever new content delivered to Github, Github will call this url so Plesk know to pull in the new changes.
6. Configure the Website location
Finally, the last step. So, know we configured Github and Plesk. Plesk has access to Github. Plesk knows when new content arrives. It pulls the right branch and places the content in the right destination folder. Great. Now we have to tell Plesk that the content of the website is at this destination folder, but with a small twist.
Remember when I said that I use Hugo for my blog? And remember that Hugo will place the generated files in the public directory? So we have to tell Plesk the correct location.
Plesk will pull the entire Git repository and places it in, in my example, /webblog. So the content of the blog is at /webblog/public. In Plesk, go to Websites & Domains and select Hosting settings for .... There you will find the Document root. Enter webblog/public here, and you are good to go!